
Tour a Greene & Greene-style Masterpiece - Fine Homebuilding
OK for you Greene and Greene fans this is a video that you must watch. This house is the CLOSEST thing to a real contemporary Greene and Greene. I have seen 2 Greene and Greene modern revivals and this one is by far the most accurate. I would love to find out what joinery technique was used for all this wood work. With modern equipment, Mortise and tenon joinery work is made a lot easier...But Pocket screws and or Festool Dominoes would probably be the way I would go about it...That would be a great conversation.
Wednesday, November 10, 2010
Wednesday, September 29, 2010
Doric Order Install update 9-22-2010
We finally get it ON THE WALL! Yeah! There is still a bunch more work to do...Stay tuned!
Thursday, September 23, 2010
A little known architectural fact, Part 1
I stumbled on this video on youtube. This is Basic architecture 101 however this video is GREAT! Its a must watch as well as Part 2 about the orders.
Sunday, September 19, 2010
Doric Order Colonnade Build Highlights 9-19-2010
Here is a Highlight video of our progress on the Doric Build. Look for more progress in the up coming week! We will be installing the Modillion blocks that we made (as seen in the video) and we will be installing the rest of our molding on the entablature. We are Almost ready to set the entablature on the columns. I know both Rob and I are anxious to see it up on the wall. Its just right around the corner! We will be installing this using a "French Cleat" method. Ill have more on that after we get it installed.
So exciting! This project is really consuming not only my time..but my thoughts as well. I just hope that some day I can build this again for a customer....
More later...
Saturday, September 18, 2010
Doric Order Show Room Piece update...
We are working as much as we can on this piece for the show room. So far everything is going together smoothly. We still have the entablature on the bench. But we have all the triglyphs and guttae drops done and installed. Today we finished making the Custom Modillion Blocks. These are placed above the triglyphs and offer a complimentary support to the corona and terminating crown above.
There was LOTS of work involved in making these blocks. However we did NOT cheat on the details, and layed out every guttae drop.. yes all 36 of them per block!
Tomorrow ( 9-19-10 ) we will have them all installed with some of the moldings and will be working on the corona and terminating cyma.
you can follow our progress shots of this build here:
Doric Order Construction Gallery
Look for an update very soon with more pics and a video highlights of our project up to date. I should have something to post after this weekend. :)
Saturday, September 11, 2010
iphone Apps for the Finish Carpenter
“There’s an App for that” We have all heard that phrase! Before I got my iphone I really didn’t understand what the big deal was. As a finish carpenter, I needed a phone to do the basic things like Email and Text message as well as just be a Phone. I also wanted to be able to get directions to jobsites and appointments as well. Little did I realize the great potential this powerful tool can do for us finish carpenters using iphone’s ability to download custom built apps purchased via Apple App store.
There are countless apps that can help you run your business, and communicate more efficiently with customers and employees. I wanted to find apps that I can use on a jobsite to be more productive. Here are few Apps that I use quite frequently to help me out as a carpenter.
BuildCalc
http://buildcalc.com/
-“How many “studs needed layout
-SIN COS TAN features
-Stair RISE/RUN
-“Tape feature” that is a history of calculations for recall purposes
-“Roof Function” calculates material for gable end roof (roof area, # of shingle squares, # of shingle bundles, # of 4x8 sheets, floor plan area)
-Drywall function: calculates number of sheets of drywall, sheathing, or plywood needed
-Hip and Valley rafter layout
-The new stair baluster layout 2.0 version ( I use for wainscoting)
Just to name a few!
My Measures

 I design a lot of my finish work using Sketchup and this app really helps me to cataloge all my measurements that I take from a jobsite for later use in Sketchup, or for reference. I no longer need to carry a digital camera and a sketch book and compile 2 or 3 forms of measurements- just to complete a drawing. Now I can produce all this info on my iphone using this app in just a few minutes-then I can then export the picture file via email to the architect, designer, contractor, or customer, all from the jobsite and not have to worry about uploading and composing that email at home after work. It saves me a lot of time and establishes better communication between myself (who is on the jobsite) to the other parties who need that information.
There are countless apps that can help you run your business, and communicate more efficiently with customers and employees. I wanted to find apps that I can use on a jobsite to be more productive. Here are few Apps that I use quite frequently to help me out as a carpenter.
BuildCalc
http://buildcalc.com/
 |
| Main Screen Interface |
BuildCalc is an Advanced Construction Calculator that offers a lot of specialized features as well as these unique help screens that assist in guiding you through the calculations. In addition to having basic construction math –which you probably already are familiar with- it has advanced formulas for figuring out compound crown molding spring angles, Drywall function (that calculates number of sheets goods needed) as well as advanced memory with M+ and 3 additional slots. These are just a few of the features that I use.
What make’s this calculator app so special are the Help screens. I have always had a hard time remembering how to use these functions, when I need it.
 |
| Help Screen Illustration |
These Help screens will explain the formula and will show you the correct input sequence by giving you a typical example to follow. Some of the screens will even display a diagram or picture to help explain the formulas. Accessing these help screens, couldn’t be easier! Just touch and hold your finger on whatever function key you need help with, and a unique screen will slide into view. The information on these help screens make it so easy to understand the math, and use the calculator to its fullest. I have also learned how to incorporate other features into my work just by reading these help screens!
Because this app takes full advantage of the iphone human interface guidelines, using these functions is quite fun! The calculator itself takes on a kind of personality with its various clicks, swipes, rotate zoom and slide in help menus, giving it a very fun and attractive interface. I find that having this app on my iphone makes layout of wainscoting and getting perfect crown molding compound miter angle settings very enjoyable. I find that it’s very convenient to have this tool with me on my iphone because it’s always there when I need it, and offers the help I need to use it. That to me is worth everything.
Features that are cool:
-Compound miter angle math for crown molding and simple protractor conversions for setting your miter saw
-Standard-metric conversions
-SIN COS TAN features
-Stair RISE/RUN
-“Tape feature” that is a history of calculations for recall purposes
-“Roof Function” calculates material for gable end roof (roof area, # of shingle squares, # of shingle bundles, # of 4x8 sheets, floor plan area)
-Drywall function: calculates number of sheets of drywall, sheathing, or plywood needed
-Hip and Valley rafter layout
-The new stair baluster layout 2.0 version ( I use for wainscoting)
Just to name a few!
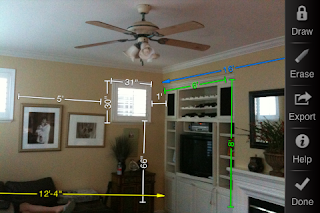
My Measures

This is a simple app that allows you to take a picture of something and put labeled measurement right on the picture itself. The interface is really easy to use and allows you to put measurements exactly at the point of reference you need. It can do this by using iphones touch screen ability. You can lable your measurements in American standard lengths and Metric units. You can also change the dimensions into different colors to organize them. This app does not take the measurements, you still need to measure the objects yourself with a tape measure, or laser measuring device. But once you have your measurements you then input them accurately on the picture of that object.
 I design a lot of my finish work using Sketchup and this app really helps me to cataloge all my measurements that I take from a jobsite for later use in Sketchup, or for reference. I no longer need to carry a digital camera and a sketch book and compile 2 or 3 forms of measurements- just to complete a drawing. Now I can produce all this info on my iphone using this app in just a few minutes-then I can then export the picture file via email to the architect, designer, contractor, or customer, all from the jobsite and not have to worry about uploading and composing that email at home after work. It saves me a lot of time and establishes better communication between myself (who is on the jobsite) to the other parties who need that information.
Now that I have this technology and use it for business I wonder how I would do with out it... :)
Friday, September 10, 2010
Formal Doric Order Reproduction

At last...This is the job I have been waiting for, a possible once in a life time project...
My buddy Robby Myer, who is opening a new Architectural Millwork super store has invited me to help him design and build his new show room. I just couldn't wait to get started on all the cool details, as well as the chance to work with Rob who is super passionate and knowledgeable about architecture as well as an experienced finish carpenter. I am anxious to learn a few tricks from an expert in design, and millwork as well as show off a few of my own. Rob also has a full shop with industrial wood working tools, and festool line, complete with dust collection to make this project that much more fun!

Over the last week, I have been working with him on the design for the main customer service counter to start, and after a couple days of kicking around many ideas and digging into my favorite book 'Get your house Right" as well as "Traditional American Rooms". We decided to recreate history as a homage to the ancient Greeks and build a classical Doric Order surround, complete with Fluted columns, Full entablature featuring Tryglyphs and Gutte drops, and a full cornice with custom modillion blocks, and egg and dart supportive crown, and a full pediment. We are using the proper scaling of the Doric order to get all the proportions as close as we can, but at the same time using the available moldings and components that will be stock inventory at the new store. This adds some challenge to the project as well as integrating illuminated icons and logo signs in the "metopes".
Check back for more updates and pictures. I'll have a gallery up on my Picasa of the progress pictures soon and we maybe doing a collaborative article for http://www.thisiscarpentry.com/ but we have LOTS of work to do first...
Wednesday, September 1, 2010
Pocket Screws + Corrugated Fasteners in MDF (real time)
Here is a video I made today to show the results in MDF face frame assembly using 2 techniques
Pocket Screws & Corrugated Fasteners. I tested the flushness results using an Engineers square and some paper and 120 sand paper sheets. The results were very close.
They both work great and have their place. Take a look!
Tuesday, August 10, 2010
iPhone article published
JLC just published my article on the iphone apps that I use. It turned out great check it out Here
Thursday, August 5, 2010
Sketchup: Transitional Craftsman

I'm working on an incredible Sketchup design project! This one in a transitional Craftsman style which is a blending of styles, where a Craftsman home would be taking on the form of anouther style. To do this, I'm blending craftman details with simple colonial profiles to bring a sense of the 1920s into this new tract home. I'm using a few new books as well to help with the design, and get the details historically correct.
I have a lot more designing to do...but stay tuned as I have some really cool renders of more rooms to show...Check out my Picture Gallery located HERE
Thursday, July 29, 2010
The Colonial Style
I have been working on a Design project for a customer that involves some intense details. Lots of Wainscoting, Pilasters, entablatures, as well as built up casings. This project has been post poned till November. But I thought I would share my SU designs as well as mention this book from Brent Hull: Traditional American Rooms
.
This book is probably the BEST design source out of many books that I have for ideas, especially when dealing with Traditional Details. Something cool that I learned recently is "Traditional" from an architectural stand point in this country means "Colonial Revival"
I have always had customers tell me they want to stay traditional...But I honestly never really knew what that meant until I started reading these books for myself as well as asking Gary Katz lots of questions ;)
This Book from Brent Hull is LOADED with pictures. The details are simply incredible and I really learned A LOT of new patterns and designs from this book alone. I would really recommend it if your into details like me. As a finish carpenter we NEED books like this if we are going to improve and stay progressive.
Here are some of my Designs I drew for my customer using Traditional American Rooms for a main reference.


Check out the rest of my original SU Design work created for this project in the Colonial Revival Style HERE
If this project continues on to the building stage. It will be amazing! Stay tuned...

The Duncan Irwin House, Up for sale!
This is my favorite Greene & Greene House. Its rare to see the interiors of any of the G&G houses especially the privately owned ones like this house is. Check out these Pictures from the realestate listing! (could be an old listing)
http://photorealestate.net/DuncanIrwinHouse/index.html
For 3.5m This seems to be about half of what this house could be going for. At least IMO. However the owners will have to enjoy the expensive up keep as well as keeping the G&G enthusiasts off their lawn (Me included) JK. I can only imagine what it would take to furnish a place like this because of its historical elements and class. It would be like living in a museum.
Also there is a G&G that is UNDER 1m in LA. Check out this article.
http://latimesblogs.latimes.com/home_blog/2010/06/a-greene-greene-for-under-1-million-and-why-its-not-selling.html
It is enlightening and does explain what its like to own a property of this caliber.
I think I agree with Indiana Jones on this "IT BELONGS IN A MUSEUM!!"
Friday, July 23, 2010
SawGear Demo
Well today Brandon Vaughn from SawGear came over to the shop to show me the SawGear system. I have to say that this could very well be Breakthrough technology for us Finish Guys. I have had some doubts as to the use with moldings...but Brandon was able to answer my questions and show me how to work through some of the potential problems. He also told me about some future tech that will be in the new version of SawGear. However I cannot disclose what it is. But I may be apart of the release and review of this new system! That is exciting, but for now I will be using this system for a month then compiling my thoughts and put a review up. I will be trying to get my story into FHB, JLC or TiC and if not it will end up here. For now I have to say that I believe that Gear will work. I just have to test it out every way I can. So stay tuned...
Tuesday, July 20, 2010
More Articles and News
JLC has 2 more of my articles that will come out soon. One on iphone apps that I use for my work. I just read the final draft and it turned out great. This article will come out in next months issue.
I have another tool review of the NEW Senco Fusion 15g nailer. This one is coming out in a few months. sept/oct
Gary Katz also asked me to write a few more and shoot some video for www.thisiscarpentry.com. I have a neat idea for a story on cutting crown molding on the flat. We use a technique that is not often used by many, and I have yet to find someone put out a video on using this technique. So I'll be working on that next week probably.
This Friday 7/23/10 will be really cool! Brandon Vaughn from www.sawgear.com is coming down to visit with me for the day. He will be bringing me a demo unit to test for a month. I will be writing a review and testing the sawgear system, to see if it will adapt to finish carpentry. I'm also working with Gary Katz on this peice as he has been demoing the saw gear and has found some interesting new things about mitersaws. Look for his review soon on TiC.
So some cool stuff to keep me busy while work is kinda up and down right now. Should be fun though. Stay tuned....
Saturday, April 17, 2010
JLC Article Published
JLC published my article on Fast job site joinery using pocket screws and corrugated fasteners.
Look for it in the April 2010 Toolbox Thank you JLC!
Look for it in the April 2010 Toolbox Thank you JLC!
Sunday, April 4, 2010
Tip Article Published!
I recently wrote an article about a great tip I learned on JLC from Frank Caputo. I put it to use on a recent job. The Trick made for a great article. THISisCARPENTRY.com Published it over the weekend. Check it out here: Frank Screw Trick
Monday, March 1, 2010
Mantel finished...
Well Dad and I finished the mantel today. Such a smooth install! We build everything so we could transport it easy by building it all as take downable components. A really fun way to do it and was possible using pocket holes.
The design was perfect too. Not over sized or heavy on the moldings. Lots of details yet restrained profiles. Check out the whole process on my gallery:
Traditional Mantel Design & Install
Let me know what you think? Im always looking for new, different, and better designs.
The design was perfect too. Not over sized or heavy on the moldings. Lots of details yet restrained profiles. Check out the whole process on my gallery:
Traditional Mantel Design & Install
Let me know what you think? Im always looking for new, different, and better designs.
Thursday, February 25, 2010
Traditional Mantel Design

Currently, Im in the shop working on this mantel for our customer. The design was inspired by a picture in Get Your House Right. I also used a few other resourses to help me decide on the details. What I like most about this design is that all the moldings are restrained. Im used to using larger moldings for mantels but every picture I have seen recently in most of my books show mantels with smaller moldings..and over hanging emphasized mantel tops. I thought I would step out of my comfort zone on this one, and use some of the new things I have been learning. Of course none of this would be possible if I did not use Sketchup to see what my ideas would look like. Also to get my customers approval on my design.
Look for an update on progress shots soon!

Subscribe to:
Posts (Atom)
